

Congratulations! You’ve received acceptance to a college or university in the USA, marking an exciting milestone in your academic journey. However, before you start packing and making travel arrangements, there’s a crucial document you must obtain: the i20 form.
In this blog, we’ll cover everything you need to know about the i20 form, from what it is and why you need it, to how to use it to obtain your student visa and kickstart your journey as an international student study in the USA.
So, grab a cup of coffee (or tea!), get cozy, and let’s begin your American education journey with the i20 form!
What is i20 Form?
The I-20Form, officially called the “Certificate of Eligibility for Nonimmigrant Student Status,” is an important document provided by schools certified by the Student and Exchange Visitor Program (SEVP) in the United States.
Think of it as your official permission slip to pursue academic goals in the USA Let’s go over its main functions:
- Proof of Acceptance and Eligibility: This form confirms that you’ve been accepted into a full-time degree or vocational program at an SEVP-approved school. It also shows that you meet the school’s admission requirements, including academic qualifications and financial resources.
- Foundation for Your Student Visa: The I-20 is a crucial part of your student visa application, providing U.S. visa authorities with proof of your legitimate student status and endorsement from your chosen school.
- Maintaining Your Status: Once you’re in the USA, the I-20 serves as a record of your authorized stay and program enrollment. It may also be needed when applying for benefits such as a Social Security number or a driver’s license (depending on your visa type).
In summary, the I20 form connects your acceptance to your student experience in the U.S.
i20 Fees for USA
Sure, the fees for the i20 form in the USA typically include:
- SEVIS Fee: This is a fee you pay to the Student and Exchange Visitor Information System (SEVIS) to process and maintain your student visa information. The SEVIS fee is $350 for F and M visa applicants.
- Visa Application Fee (MRV Fee): The Machine Readable Visa (MRV) fee is $160 for most non-petition-based nonimmigrant visas, including the F-1 student visa.
- School-Specific Fees: Some schools may charge an additional fee for processing the I-20 form or other administrative purposes. This fee can vary greatly depending on the institution.
These are the main fees associated with obtaining an I-20 for studying in the USA. However, it’s important to check with your chosen institution and the US embassy or consulate in your country for the most up-to-date information and any additional requirements or fees.
Steps to apply for the i20 form?
Remember, these steps may vary slightly depending on your country of residence and the specific requirements of the US embassy or consulate where you apply. Always check for any updates or changes to the application process.
- Receive Admission Offer: First, you need to apply and get accepted to a Student and Exchange Visitor Program (SEVP)-certified school in the USA. This involves submitting your academic records, test scores (like TOEFL or IELTS), recommendation letters, and any other required documents.
- Pay SEVIS Fee: Once accepted, you must pay the SEVIS I-901 fee. You can do this online through the SEVIS website. You’ll need to have your SEVIS ID number, which is on the Form I-20 or DS-2019, and the name and address of the school you plan to attend.
- Receive Form I-20: After the school receives your acceptance and SEVIS fee payment, they will issue you a Form I-20. This is a certificate of eligibility for nonimmigrant student status. The I-20 contains important information, including your SEVIS ID number, program start and end dates, estimated costs, and the school’s information.
- Pay Visa Application Fee: You need to pay the visa application fee (MRV fee) before scheduling your visa interview. This fee is paid online through the Department of State website or designated payment channels in your country.
- Complete Visa Application (DS-160): Fill out the online nonimmigrant visa application form DS-160. You’ll need your passport, I-20 form, SEVIS ID, and details about your travel plans and previous visits to the USA.
- Schedule Visa Interview: Use the online system of the US embassy or consulate in your country to schedule a visa interview appointment. Wait times for interview appointments can vary, so it’s recommended to schedule as early as possible.
- Prepare for the Interview: Gather all required documents for your visa interview. This includes your passport, Form I-20, DS-160 confirmation page, SEVIS fee payment receipt, financial documents proving your ability to cover expenses, and any additional documents required by the embassy or consulate.
- Attend Visa Interview: On the day of your interview, arrive early and be prepared to answer questions about your educational background, intentions in the USA, and financial situation. Be honest and confident during the interview.
- Receive Visa Decision: After the interview, the consular officer will inform you whether your visa application is approved, denied, or pending further administrative processing.
- Travel to the USA: If your visa is approved, you will receive your passport with the visa stamped inside. You can then make travel arrangements to the USA, ensuring to arrive before the program start date listed on your I-20.
Read More: Documents Required and How to Apply for an F1 Visa for International Students
Form i20 Processing Time
What is the Validity of Form i20?
The validity of the Form I-20 is directly linked to your enrollment in a program at a SEVP-approved US institution. Here are the key points:
- Valid as Long as Enrolled: The Form I-20 remains valid as long as you are actively enrolled in your program and maintain full-time student status.
- Program Completion or Extension: If you complete your program within the timeframe specified on the I-20, it expires then. However, if you extend your studies, the validity of your I-20 can be extended accordingly.
- School’s Role: Your school’s Designated School Official (DSO) is responsible for maintaining the validity of your I-20. They update the form if your program end date changes due to an extension or transfer.
An analogy to understand the validity: Think of the I-20 as a library card for the US educational system. It gives you access to the resources and opportunities available to international students, but its validity depends on your continued enrollment and adherence to the school’s rules.
Read More: Best Scholarships for International Students Study Abroad in the USA
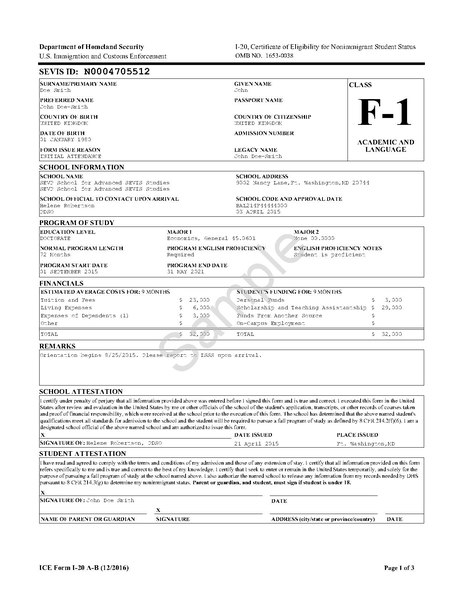
What is i20 form: Sample
What’s in an I20 form: The format may vary slightly depending on the school, but it typically includes:
- Student Name and Date of Birth
- SEVIS ID number
- Program details (name, start date, end date)
- Estimated cost of attendance (tuition and living expenses)
- School information (name, address, SEVP certification)
Here’s an example of what an I20 form looks like: [Sample of I20 Form]


